Build a simple Ethereum + InterPlanetary File System (IPFS)+ React.js DApp.
WHY ARE WE BUILDING THIS?
It is prohibitively expensive to store a lot of data on the Ethereum blockchain. According to Ethereum’s yellow paper it is approximately 20,0000 gas for 256bit/8 bytes (1word). Based on 02/28/2018 gas prices of 4 gwei/gas. See: https://ethgasstation.info for current prices.
20,000 gas per Transaction of 8 bytes x 4 gwei/gas = 80,000 gwei for 8 bytes.
80,000 gwei for 8 bytes. x 1000bytes/8 = 10,000,000 gwei/kB = .01 Ether
.01 Ether/kB x 1000kB = 10 Ether to store a 1Mb at $860/ether = $8600.00! It would cost $8,600,000.00 to store a 1 GB file on the Ethereum blockchain!
To store Ethereum’s 38 page PDF yellow paper (520Kb) = $4472 USD. See: http://eth-converter.com/ for conversions.
If we can only afford to store a couple of Kb of data on the blockchain, then we would still have to rely on a centralized server to store data. Thankfully, a solution to store data on decentralized network called the InterPlanetary File System (“IPFS”) is available. See: https://ipfs.io/ to read more. When looking up files in IPFS, you are asking the network to find nodes storing the content behind a unique hash. From IPFS’s own website:
“IPFS and the Blockchain are a perfect match! You can address large amounts of data with IPFS, and place the immutable, permanent IPFS links into a blockchain transaction. This timestamps and secures your content, without having to put the data on the chain itself.”
WHAT ARE WE BUILDING?
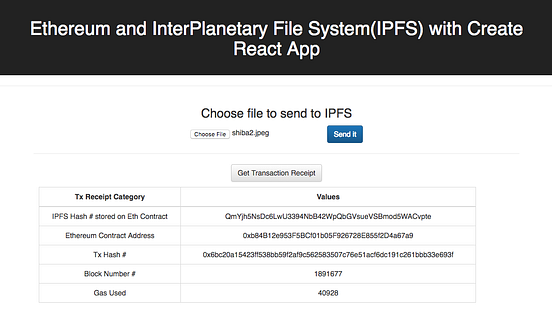
A simple DApp to upload a document to IPFS and then store the IPFS hash on the Ethereum blockchain. Once the IPFS hash number is sent to the Ethereum blockchain, the user will receive a transaction receipt. We will use Create-React-App framework to make a front-end. This Dapp works with any user that has MetaMask installed in their browser.
This is what the DApp will look like when we are done:

HOW TO BUILD IT:
NOTE: Please see my github at https://github.com/mcchan1/eth-ipfs if you just want the code.
Before we begin, these are the assumptions I’ve made:
Assumptions about User: The User has Metamask installed to interact with DApp.
Assumptions about you/Developer: You have some familiarity with JavaScript and/or React.js as well as Node.js/NPM. Important note: please make sure you are running a current version of Node and NPM. For this tutorial I’m running: node v8.9.4 and NPM 5.6.0.
Install MetaMask. If do not already have MetaMask installed, please go to https://metamask.io/ and follow the instructions. This DApp will assume the user has MetaMask installed.
Create a directory to store our DApp. For this tutorial, I’ll call it “eth-ipfs.”
Install Create-React-App and other dependencies using NPM. Use NPM and install the following:
npm i create-react-app
npm install react-bootstrap
npm install fs-extra
npm install ipfs-api
npm install web3@^1.0.0-beta.26
Enter the “eth-ipfs” directory, type “npm start” and Create-React-App should automatically render on http://localhost:3000/.
Note: if you have not used create-react-app until now, you may have to install it globally first
1. sudo npm install -g create-react-app
or npm install -g create-react-app
2. create-react-app eth-ipfs
3. cd into eth-ipfs and “npm start”
Deploy the following Solidity code using Remix on the Rinkeby testnet. See, https://remix.ethereum.org. You will need some Rinkeby test ether, if you do not already have some go the Rinkeby faucet for free test ether. https://www.rinkeby.io/#faucet .
pragma solidity ^0.4.17;contract Contract {
 string ipfsHash;

 function sendHash(string x) public {
   ipfsHash = x;
 }

 function getHash() public view returns (string x) {
   return ipfsHash;
 }}
Save the contract address where it is deployed and Application Binary Interface (ABI). To obtain the ABI of the contract, in Remix go to your contract address:
Click the “Compile” tab, then click the grey “Details” button.

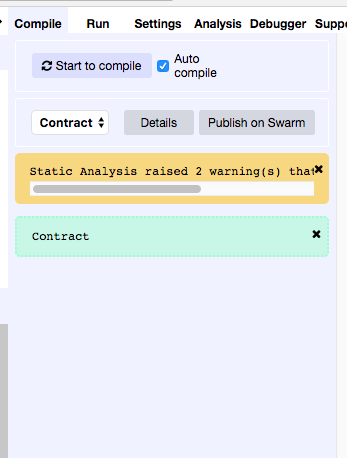
This will bring up the Details window. Copy the “ABI,” it is a JSON file.

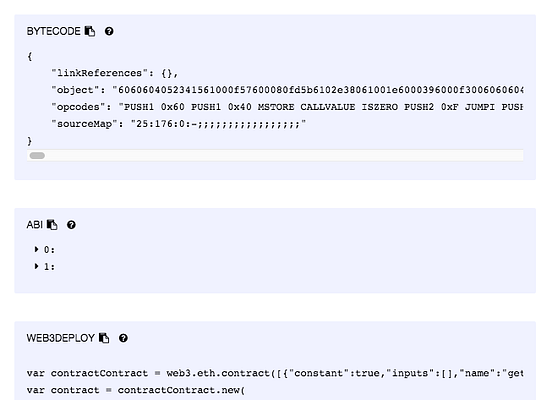
Personally I prefer put the ABI JSON into a formatter, such as https://jsonformatter.org and check if it is valid before using it in my javascript code. Save the contract address and ABI for later.
Inside our “eth-ipfs/src” directory, create the following files: web3.js, ipfs.js, and storehash.js. The bulk of our code will be in App.js.

web3.js
We want to use the 1.0 version of web3.js , because unlike the 0.20 version, 1.0 allows us to use async and await instead of promises in our javascript. At the moment, MetaMask’s default web3.js provider is version 0.20. So, lets make sure we override the default version of Metamask’s web3 version 0.20, and use our 1.0. Here is the code:
//overrides metamask v0.2 for our 1.0 version.
//1.0 lets us use async and await instead of promisesimport Web3 from ‘web3’;

const web3 = new Web3(window.web3.currentProvider);export default web3;
storehash.js
In order for web3.js to have access to the contract we deployed to Ethereum’s Rinkeby testnet earlier, you will need the following:1) contract address and 2) the ABI from the contract. Be sure to import your web3.js file from your /src directory as well. Here is the code:
import web3 from './web3';//access our local copy to contract deployed on rinkeby testnet
//use your own contract addressconst address = '0xb84b12e953f5bcf01b05f926728e855f2d4a67a9';//use the ABI from your contractconst abi = [
  {
    "constant": true,
    "inputs": [],
    "name": "getHash",
    "outputs": [
      {
        "name": "x",
        "type": "string"
      }
    ],
    "payable": false,
    "stateMutability": "view",
    "type": "function"
  },
  {
    "constant": false,
    "inputs": [
      {
        "name": "x",
        "type": "string"
      }
    ],
    "name": "sendHash",
    "outputs": [],
    "payable": false,
    "stateMutability": "nonpayable",
    "type": "function"
  }
]export default new web3.eth.Contract(abi, address);
ipfs.js
In this tutorial, we will run the ipfs.infura.io node to connect to IPFS instead of running an IPFS daemon on our own computer. In the code comments, you can also choose to run your own IPFS daemon if you install IPFS as a global dependency. See, https://infura.io/ for more information about using their nodes. Here is the code:
//using the infura.io node, otherwise ipfs requires you to run a //daemon on your own computer/server.const IPFS = require(‘ipfs-api’);
const ipfs = new IPFS({ host: ‘ipfs.infura.io’, port: 5001, protocol: ‘https’ });//run with local daemon
// const ipfsApi = require(‘ipfs-api’);
// const ipfs = new ipfsApi(‘localhost’, ‘5001’, {protocol:‘http’});export default ipfs;
App.js
This is the order of operations in App.js
- Set the state variables.
- Capture the User’s file.
- Convert the file to a buffer.
- Send the buffered file to IPFS
- IPFS returns a hash.
- Get the User’s MetaMask Ethereum address
- Send the IPFS for storage on Ethereum.
- Using MetaMask, User will confirm the transaction to Ethereum.
- Ethereum contract will return a transaction hash number.
- The transaction hash number can be used to generate a transaction receipt with information such as the amount of gas used and the block number.
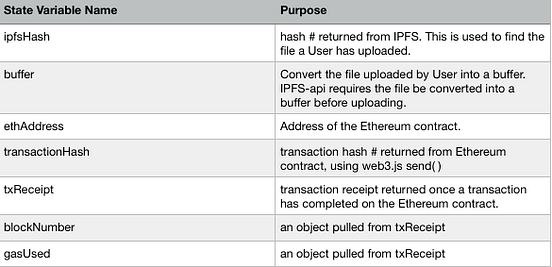
- The IPFS and Ethereum information will render as it becomes available in a table using Bootstrap for CSS. NOTE: I didn’t create an isLoading type variable to automatically re-render state for the blockNumber and gasUsed variables. So for now, you will have to click again or implement your own loading icon. A table describing the variables and functions, followed by the code itself are below:



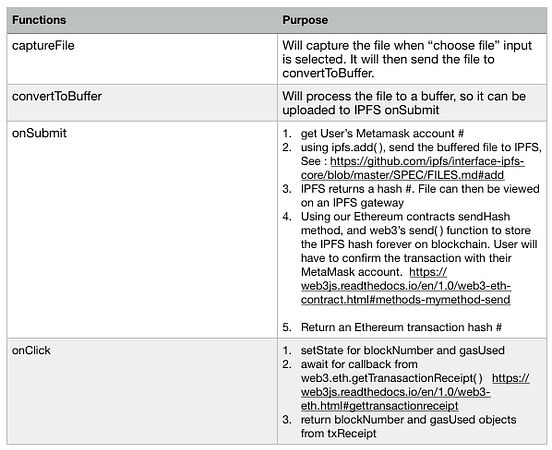
Finally, here is the App.js code:
import React, { Component } from ‘react’;
//import logo from ‘./logo.svg’;
import ‘./App.css’;
import web3 from ‘./web3’;
import ipfs from ‘./ipfs’;
import storehash from ‘./storehash’;class App extends Component {

    state = {
      ipfsHash:null,
      buffer:'',
      ethAddress:'',
      blockNumber:'',
      transactionHash:'',
      gasUsed:'',
      txReceipt: ''
    };captureFile =(event) => {
        event.stopPropagation()
        event.preventDefault()
        const file = event.target.files[0]
        let reader = new window.FileReader()
        reader.readAsArrayBuffer(file)
        reader.onloadend = () => this.convertToBuffer(reader)
      };
 convertToBuffer = async(reader) => {
      //file is converted to a buffer for upload to IPFS
        const buffer = await Buffer.from(reader.result);
      //set this buffer -using es6 syntax
        this.setState({buffer});
    };onClick = async () => {try{
        this.setState({blockNumber:"waiting.."});
        this.setState({gasUsed:"waiting..."});//get Transaction Receipt in console on click
//See: https://web3js.readthedocs.io/en/1.0/web3-eth.html#gettransactionreceiptawait web3.eth.getTransactionReceipt(this.state.transactionHash, (err, txReceipt)=>{
          console.log(err,txReceipt);
          this.setState({txReceipt});
        }); //await for getTransactionReceiptawait this.setState({blockNumber: this.state.txReceipt.blockNumber});
        await this.setState({gasUsed: this.state.txReceipt.gasUsed});
      } //try
    catch(error){
        console.log(error);
      } //catch
  } //onClickonSubmit = async (event) => {
      event.preventDefault();     //bring in user's metamask account address
      const accounts = await web3.eth.getAccounts();

      console.log('Sending from Metamask account: ' + accounts[0]);    //obtain contract address from storehash.js
      const ethAddress= await storehash.options.address;
      this.setState({ethAddress});    //save document to IPFS,return its hash#, and set hash# to state
    //https://github.com/ipfs/interface-ipfs-core/blob/master/SPEC/FILES.md#add       await ipfs.add(this.state.buffer, (err, ipfsHash) => {
        console.log(err,ipfsHash);
        //setState by setting ipfsHash to ipfsHash[0].hash
        this.setState({ ipfsHash:ipfsHash[0].hash });   // call Ethereum contract method "sendHash" and .send IPFS hash to etheruem contract
  //return the transaction hash from the ethereum contract
 //see, this https://web3js.readthedocs.io/en/1.0/web3-eth-contract.html#methods-mymethod-send

        storehash.methods.sendHash(this.state.ipfsHash).send({
          from: accounts[0]
        }, (error, transactionHash) => {
          console.log(transactionHash);
          this.setState({transactionHash});
        }); //storehash
      }) //await ipfs.add
    }; //onSubmitrender() {

      return (
        <div className="App">
          <header className="App-header">
            <h1> Ethereum and IPFS with Create React App</h1>
          </header>

          <hr /><Grid>
          <h3> Choose file to send to IPFS </h3>
          <Form onSubmit={this.onSubmit}>
            <input
              type = "file"
              onChange = {this.captureFile}
            />
             <Button
             bsStyle="primary"
             type="submit">
             Send it
             </Button>
          </Form><hr/>
 <Button onClick = {this.onClick}> Get Transaction Receipt </Button>  <Table bordered responsive>
                <thead>
                  <tr>
                    <th>Tx Receipt Category</th>
                    <th>Values</th>
                  </tr>
                </thead>

                <tbody>
                  <tr>
                    <td>IPFS Hash # stored on Eth Contract</td>
                    <td>{this.state.ipfsHash}</td>
                  </tr>
                  <tr>
                    <td>Ethereum Contract Address</td>
                    <td>{this.state.ethAddress}</td>
                  </tr>                  <tr>
                    <td>Tx Hash # </td>
                    <td>{this.state.transactionHash}</td>
                  </tr>                  <tr>
                    <td>Block Number # </td>
                    <td>{this.state.blockNumber}</td>
                  </tr>                  <tr>
                    <td>Gas Used</td>
                    <td>{this.state.gasUsed}</td>
                  </tr>

                </tbody>
            </Table>
        </Grid>
     </div>
      );
    } //render
} //Appexport default App;
I added a little bit of CSS in src/App.css to make it a little easier on the eyes:
/*some css I added*/
input[type=”file”] {
 display: inline-block;
}.table {
 max-width: 90%;
 margin: 10px;
}
.table th {
 text-align: center;
}
/*end of my css*/
And add some imports to src/index.js:
/*https://github.com/facebook/create-react-app/blob/master/packages/react-scripts/template/README.md#adding-a-stylesheet*/
import ‘bootstrap/dist/css/bootstrap.css’;
import ‘bootstrap/dist/css/bootstrap-theme.css’;
That is it! Your DApp should be done. So all you need to do is a choose a file, send it, and get a transaction receipt. If you are connected to an IPFS node via your localhost:3000, then you should be able to see your file at one of the IPFS gateways. https://gateway.ipfs.io/ipfs/ + your IPFS hash#.
For example: https://gateway.ipfs.io/ipfs/QmYjh5NsDc6LwU3394NbB42WpQbGVsueVSBmod5WACvpte
A note about IPFS, is that unless your file is picked up by another node or you pin it, IPFS will eventually be garbage collect your file. There is a lot more about this on their website.
Reference links:
- https://ipfs.io/docs/getting-started/
- https://web3js.readthedocs.io/en/1.0/index.html
- https://infura.io/
- https://react-bootstrap.github.io/getting-started/introduction
- https://metamask.io/
- https://github.com/ipfs/js-ipfs-api
- https://remix.ethereum.org/
- https://ethereum.github.io/yellowpaper/paper.pdf
- https://ethgasstation.info
- http://eth-converter.com/
- https://www.rinkeby.io/#faucet
- https://developer.mozilla.org/en-US/docs/Web/API/FileReader
- https://github.com/ipfs/interface-ipfs-core/blob/master/SPEC/FILES.md#add
- https://web3js.readthedocs.io/en/1.0/web3-eth-contract.html#methods-mymethod-send
- https://web3js.readthedocs.io/en/1.0/web3-eth.html#gettransactionreceipt
- https://github.com/mcchan1/eth-ipfs


